As I mentioned above, using your own photo isn't that effective. Even using the "fine tuning" tools to define the mouth, nose and eyes, there are limitations. It does work to the extent that you can get a face on the front of the head mesh. But typically the neck and sides and back and top are not covered. People Putty handles this by allowing you to choose a "cover" which covers these areas. The cover is never going to match the coloration of the face unless you're really lucky. Once you have the cover in place, you can put hair on top (once again in the form of a texture). At this point you've gotten as good as you are going to get.
So I don't use this method; I paint the texture from existing photos. I use Paint Shop Pro 8 for texturing, but many paint packages will provide similar functionality. I'm not going to go into a lot of detail on what each function mentioned below does; I'd have to write a book. So this assumes you have some limited knowledge of paint programs. Note that I don't consider my self an artist as I don't really do any painting. I'm really just a mechanic that follows a process.
What I did on my last Haptek character (not yet published) it to find a high resolution photo of someone. I've purchased photo collections that are designed to be used for texture creation, so I have a good selection, but a 800x600 texture from the net would work as well.
I start by loading an existing Haptek texture into PaintShop. I then resize it to 2048x2048.
I create a 2nd drawing layer above it. This allows me to have two images, one on top of the other, with the top layer transparent except for areas that I paint. I do this so that I can use the Haptek texture as a guide for the new texture.
I then copy sections of the photo onto the top layer using the bottom layer as a guide. For example, I select the left brow and eye of the photo using the "selection tool", and copy it into the clipboard buffer. Then I select the exact same section of the Haptek texture. Then I perform a "Copy into selection" function which copies the brow & eye into the selected area. Paintshop automatically resizes the photo selection to fit within the selected area. If I did a good job with my selection, the brow and eye fit nearly perfectly over the Haptek texture brow and eye. Sometimes I have to try two or three times to get a fit that I am happy with. I also set the transparency setting for the top layer to 50% so that I can see through it to the bottom layer to make sure my fit is exact.
I then repeat this step for the other eye, the nose, and the mouth and ears. It takes some trial and error to get it right. Now I have to fill in the gaps between these areas.
To do the gaps, I then copy sections of the photo into the other areas. For example, I copy the cheek from the photo onto the cheek section of the texture. Again, trial and error is needed to get the fit right. It doesn't have to be perfect, because I can cover up imperfections later. However, if I don't at least get it close, it takes forever to clean it up later.
After a while, I have every section of the photo copied into my top layer in exactly the right spots. At this point, I will load this into People Putty onto the head to see how it fits. If there are areas I don't like, I tweak them in Paintshop until I'm happy.
Now I have a texture that is the equivalent of the applying the photo using People Putty, but far more exact in it's representation of the photo. You could potentially skip all the above and instead use People Putty to get this far, but I haven't been happy with the results when I tried it.
At this point, you have to fill in everything else. What I typically do here is create a "skin texture sample". This is a square, 80x80 or so, of a section of the skin that I think is typical. I create it by selecting a section of skin, copying it to a separate image, then touching it up with the clone brush and paint brush and some of the other tools until I have a section of skin which is uniform, but not all one color. I then use the Paintbrush function to paint this image over the rest of the gaps between areas. This it typically the sides and back of the neck and the sides, back and top of the head.
At this point I have a bald head. There are typically some mismatches in the various texture copies, so I use the close brush and smudge brush to paint these out. I rarely RARELY paint color with the paint brush; as I said, I don't consider myself an artist.
Now I'm nearly finished. I load it back into People Putty and check the fit around the eyes, nose, mouth, ears, and the overall general texure appearance. This generally results in more changes using the one of the techniques mentioned above (section copies, clone brush, etc.).
Whatever the size of the texture I load, People Putty resizes it to what I've selected via the interface (256x256, 512x512 or 1024x1024). This is the size that is saved when the haptar file is built.
The site
www.renderosity.com is a Poser site with a number of tutorials, many of which describe similar or alternate painting techniques. Some of them describe actually painting an image; it's very hard to get a "photo-realistic" image by hand painting.
There are tons of detail I left out; hopefully some of it will be obvious when you're in the middle. This can be a tedious process which is why a number of my recent characters have the same or only slightly modified texture, and why I'm not doing some of the recent requests I've gotten.


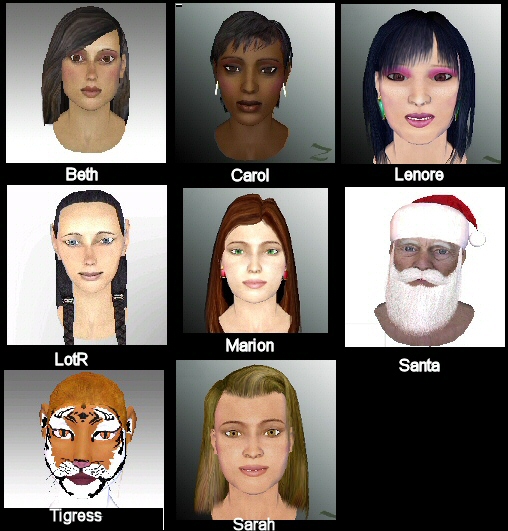 Portraits.jpg
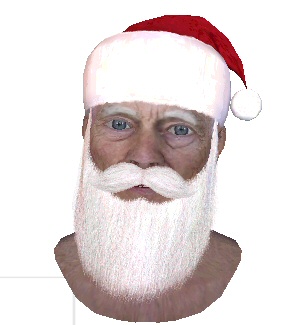 Santa.jpg